
PURCHASE SAM'S BOOKS & DVD
Text Size   | | |
Purchase Book |
Sample Excerpts
The following excerpts are from Chapter 3:
Physical therapists are fond of saying: “If you don't use it, you lose it!” But when you are chronically ill or injured or are recovering from surgery, traditional or standard exercise becomes nearly, if not totally, impossible. It's easy to become discouraged. Even if you are able to exercise, are you sure that those exercises are appropriate for your condition?
Here is a series of non-stressful, minimal movement exercises that are most appropriate for your recovery. They embellish upon the breath, body, and mind connection. It is imperative that you begin here as you will establish the foundations for the exercises in the chapters that follow. In this chapter, we will integrate breath management with the movement of your body. Coordinating your breath with the movement of your body is what makes yoga different from common exercise. More specifically, common exercise is “outer directed,” whereas yoga is “inner directed.”
Outer directed exercise is when you exercise to meet a specific goal. For instance, participating in a sport where the objective is to make points, to beat an opponent, or to improve time is outer directed. Exercising specifically to lose weight or exercising while enjoying the camaraderie of others is outer directed. Exercising to the beat of music or using a treadmill while watching television is outer directed. Exercise done to you by a physical therapist or when you train with a personal trainer is outer directed. And so on.
Inner Directed Exercise
Inner directed exercise, on the other hand, is when you have no specific intention or goal other than the exercise itself and to stay aware during the exercise. The purpose is to use the exercise to explore more of what is inside you than outside you. Can I turn my attention inward during exercise and quiet my mind? How can I direct the feeling to a more specific area of my body? How does it feel? Where does movement begin? Where does it end? Can I stay aware of my breath during each movement?
Our intention with inner directed exercise, then, is to let go of goals; of forcing or trying. The very nature of trying by the way, is in and of itself, outer directed.
Under normal circumstances, you don't feel your body. It's just there operating in the background providing you with the vehicle that takes you about your daily business. However when you are chronically ill or injured, your body no longer feels as if it is in the background. It is ever present reminding you that your former comfort and freedom of movement no longer exists. This program is designed not only to give your body a jump start toward wellness, but to take your mind off the discomfort of your body, quiet your mind and offer you some relief.
There may be some exercises in this program, that based upon your current condition, may be inappropriate for you. Under no circumstances do I encourage you to “work through the pain.” I intentionally began this program with exercises that, at first glance, may have seemed extremely simple. They are important. Regardless of your physical condition, every one, begins here. Only your condition determines how fast or how slow you go. The elementary exercises in this chapter become the foundations for all exercises that follow. Learning to control your breath and to coordinate it with the movement of your body has remarkable and beneficial effects upon your blood chemistry and nervous system.
Simply do what you can do without pain or effort. If you can not complete an exercise without creating or exacerbating your pain, go back to the previous exercise and stay with it until you can continue on without pain or discomfort. Remember that success is not measured by how much you can do. It is measured by simply doing what you can do at any given moment.
You have spent a good amount of time setting your breathing foundations and learning the three part diaphragmatic breath. In all the exercises that follow, I am going to instruct you to integrate your controlled deeper and softer breath with each exercise. As you practice, allow your deeper breath to move diaphragmatically. That is, during inhalation, breathe first into your belly, then secondly, move that same inhalation up into the middle ribs and, if possible, complete the third part of your inhalation in your upper chest. Then allow your exhalation to move downward; from the top, to the middle ribs, and finally concluding your exhalation in your belly. You never have to force or completely fill all the way up or empty all the way down. Just simply and easily breathe in this three part mode.
PRACTICE REMINDER
Remember that each exercise is a foundation builder. That is, what you learn from one exercise is a foundation for the next. Do as many of the exercises as you can in the order presented. After you have become familiar with them, you can adapt any or all of them according to the guidelines given in the Conclusion.
If you can get down on the floor, lie on a soft carpet or exercise pad. Otherwise, lie on your bed. As always, support your head if necessary.
Exercise 14: Moving Fingers with Breath
You might consider this first set of exercises unimportant. However, other than diaphragmatic breathing, this is the first foundation exercise which coordinates body movement with breathing.
When you are ready to begin, take a soft, deep inhalation and do nothing other than pay attention to your breath. Then, during your next long and slow exhalation, slowly close your fingers making a lightly held fist with both hands. That's right! While controlling your exhalation, slowly move your hands into softly held fists (The object is to coordinate the movement of your fingers with your exhalation). Hold your fists closed during your next inhalation. Then as you exhale, slowly straighten your fingers as you release your fists. “Rest” your hands during your next inhalation. Then again coordinate your next exhalation with the closing of your hands. Every time you exhale, you will be moving your fingers either into or out of a fist. Every time you inhale, your fingers will not move. Do this a couple of times to get the idea
OK, now let's do some exercises which further coordinates the movement of your hands with your breath. Your intention is to lengthen the time it takes make and release your fist(s). You can approach it both ways. Slowing your breath slows the movement of your hands. Or slowing your hand movement slows your breath. Remember: Move your fingers only during exhalation:
- Coordinate your exhalation with the closing only your right hand. Hold your fist while you inhale and open your hand during your next exhalation. Do a set of five.
- Coordinate your exhalation with the closing only your left hand. Hold your fist while you inhale and open your hand during your next exhalation. Do a set of five.
- Coordinate your exhalation with the closing of both hands. Hold your fists while you inhale and open your hands during your next exhalation. Do a set of five.
Finally, doing something a little different, coordinate your exhalation while you close your hands and then while you inhale, open your hands. Do a set of five each with your right hand; your left hand; then both hands.
CAUTION
If any of the next exercises cause or exacerbate pain anywhere in your body, you must immediately stop. Because these exercises are progressive in nature, you need to go back to an exercise where you felt totally comfortable. From there, take your time to reset your foundations and then continue. From time-to-time, you will see instructions to modify an exercise or to eliminate it. You must always remember that there is a difference between feeling tired and experiencing pain. If you become tired, simply stop and rest. If you experience pain, you must modify your movement by doing less or stop altogether and go back to a previous exercise that gave you no discomfort. This will help you set your foundations in a non aggressive manner and allow you to continue according to your capacity.
Exercise 15: Moving Arms with Breath
Begin with both arms at your side, palms down. Take a deep inhalation. As you exhale, slowly move your right arm straight up and over your head as far as it can go without pain (see Caution). Conclude your exhalation when your arm comes all the way over your head [Fig.12] or goes as far as it can without pain. If there is pain or stiffness as your arm reaches its endpoint, place a support where your arm will land [Fig. 13].
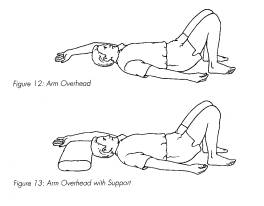
As soon as your arm has come to rest above your head, take a slow deep inhalation and relax. Then coordinate your exhalation as you return your arm over your head to the side of your body. Repeat in sets of five with each arm.
Since the object with this exercise is to coordinate the movement of your arm with your breath, practice until you can conclude your exhalation at the very moment your arm completes its movement and comes to rest.
PRACTICE TIP
If your arm can not go all the way over your head comfortably, place a pillow or one or more folded blankets over your head where your arm will land. If moving your arm directly over your head hurts your shoulder, you can adapt the exercise by moving your arm sideways (like angel wings) as far as you can go without pain. Remember never force or cause discomfort anywhere.
PRACTICE REMINDERS
The object of each of these exercises is to:
• Slow the time it takes to move your body with your breath. You can approach it either way: Slowing your breath slows the movement of your body; or slowing the movement of your body slows your breath.
• Coordinate the movement of your body with your breath.
• Create an appropriate “action” without creating or exacerbating any pain what-so-ever
• Find the endpoint for each exercise where you can hold and “relax” into the “action.” That is, move into a place where you feel a mild stretch that is neither painful nor intense.
Exercise 16: Wind milling Arms With Breath
Once you have mastered “exhaling” each arm over your head and “exhaling” it back down again, you are ready for the more advanced variation which is slowly “wind milling” your arms with a coordinated breath. Begin by taking a deep inhalation. As you exhale, slowly extend your right arm over your head. Rest during inhalation. During your next exhalation, simultaneously extend your left arm over your head while at the same time, return your right arm to your side [Fig. 14 and Fig. 15 with arm supported]. Inhale and rest; exhale and repeat again moving both arms simultaneously.
Practice until both arms reach their opposite endpoints at exactly the same time which might be more difficult that you would expect.
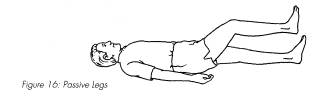
Exercise17: Extension Releases Tension
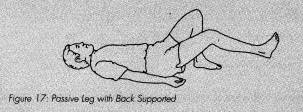
This exercise teaches you one of the most fundamental and important principles of exercising your body: “Extension Releases Tension.” Lie on your back with your legs fully extended. Begin by lifting your right leg only about twelve to sixteen inches off the floor [Fig.16]. For now, forget how you are breathing. Just lift and hold it up for a few breaths. Take a look. Is your foot really twelve to sixteen inches up? (Adjust if necessary and remember not to judge but to simply observe.) After holding your leg for several breaths, slowly place it back down. Repeat with your other leg. Pay attention to what is happening and how it feels.
PRACTICE TIP
If your back hurts when lifting your leg, simply bend the opposite leg and firmly press its foot into the floor [Fig.17].
Did you experience any discomfort in your elevated leg or hip? Did your leg feel heavy? Did it shake? Did it quickly become tired? Did your lower back ache? If you experienced no discomfort what so ever, hold your leg up again for a longer time allowing it to hang loosely. You should soon experience some or all of these discomforts.
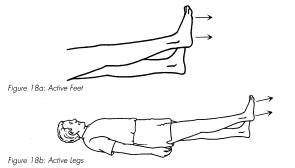
Now, before you lift your leg, extend both your heel and toe mounts (that part of your foot where your toes attach) away from you. Keep extending your leg away from you for the entire time you hold it up. The feeling you want to create is that your foot and entire leg is reaching for the wall on the other side of the room. This should give you a feeling that your feet are active [Fig.18a] and that your entire leg is actively stretching away from you [Fig.18b].
This is known as activating your foot. Keep your heel and toe mounts extended (activated) as you again slowly lift your leg about twelve to sixteen inches up and hold it there for a few breaths. Remember to keep extending the entire time you are lifting your active leg. Exhale while you lower your leg. Repeat three to six times with each leg.
PRACTICE DETAIL
Take a moment to double check the height of your elevated leg. Initially, it may be difficult to accurately gauge when it is twelve to sixteen inches high, however with practice you will soon be able to accurately determine its height even with your eyes closed.
An extended leg with an active foot releases tension. This is a fundamental principle of this program;Extension Releases Tension. You can apply this principle to your arms as well. Take a moment; with your breath, “wind mill” your arms as you did in Exercise 16. This time however, activate your hands by stretching your fingers and making an “L” with your thumb (Fig.19).
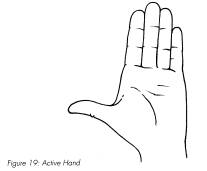
Activating your hands helps your arms to extend in the same way activating your foot helps to extend your leg.
Exercise 18: Coordinating Movement of Legs With Breath
Start by lying down. When ready, take a deep inhalation. During exhalation, extend and slowly lift your right leg about twelve to sixteen inches. Inhale as you extend your leg. Feel as if you are extending your leg away from your hip, through your knee and through your foot. As you exhale, slowly lower your leg back down keeping it extended until it touches the floor. Then inhale and completely relax resting for as long as you wish. When you are ready; exhale, extend, and lift the opposite leg twelve to fourteen inches off the floor. Hold and keep it extended during inhalation. Then lower it during exhalation.
While coordinating your breath, lift alternate legs, one at a time, until you can comfortably “breathe” your legs up and down without tension. Remember to keep your leg and foot active when lifted. Do as many sets as you wish.
PRACTICE REMINDERS
- Keep your eyes rotating downward
- Keep your tongue soft and off the palette
- Relax your jaw and unclench your teeth
- Breathe through your nose if possible, allowing your breath to make a gentle “hissing” sound.
- And above all, always remember that Extension Releases Tension.
Sequence: Putting It Together - Coordinating Movement of Arms and Legs with Breath:
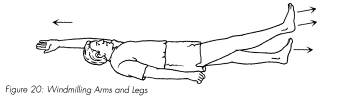
This sequence brings together all you have learned thus far. Extend and slowly lift your right leg twelve to sixteen inches off the floor while simultaneously extending and moving your left arm all the way over your head. Coordinate both movements with your exhalation. [Fig. 20]. (If necessary, use a support for your arm when it comes to rest over your head.)
Then inhale and keep both your arm and leg extended and active. During exhalation, slowly return your arm and leg to where you began. Inhale and totally relax. Rest as long as you wish.
When you are ready to continue, exhale and lift the left leg and right arm. Inhale at your endpoint keeping your arm and hand as well as your leg and foot active. Exhale as you return your arm and leg.
The object is to coordinate the movement of your arms and legs with your breath. Therefore, practice until your exhalation concludes at the very moment your arm and leg complete their movement, both when going up and coming back down.
CAUTION
Depending upon your condition, this sequence could be strenuous. Omit this (or any) exercise if it causes or exacerbates discomfort or pain.
| Read More from Chapter 7 | |
 Return to Top